
I have to admit that in the software development, the authentication and authorization stuff has always been one of those areas where I don’t feel confident enough that I could build a secure and production-ready solution. Probably because I haven’t had a chance to give a proper attention to the authentication aspect of the application development. My main focus has been elsewhere due to the business requirements or my own interest. But guess what. Recently I was assigned to some project – and hell yes, that’s the authentication and authorization related project.
[wpsm_toplist]
The company that I currently work for provides its customers many services via web-based products. We have around 10 different web applications accessible via public web sites.
The problem is that the majority of those applications are consumed by the same customers and they are kind of forced to sign-up for all those applications separately. As you may have guessed, the company wants an SSO (Single Sign-On) solution, so that customers would only sign-up once, but they could be authorized to use as many services as they have paid for.
When I first started doing research work for the proof-of-concept implementation, I was struggling to find all the necessary information, the Microsoft’s documentation is vast, but I wasn’t sure whether this or that is something I want, or lots of sample code that I was able to find wasn’t full or was not working for me. Also, Azure AD B2C UI is being changed/updated, so some bits doesn’t match to the examples other people provide, etc.
After all, I was finally able to build my proof-of-concept solution, and I thought I will share my solution in this blog.
In this article, I will show how to implement the authentication part using ASP.NET Core, Microsoft Azure AD B2C, Azure Functions, and Custom Policies. I will also touch on the authorization bits to give you an idea on how it can be done too. This solution contains of couple of applications, in order to demonstrate a real-world solution example (or at least very close to the real).
What are we building here?
In this article, I will show you how you can build a solution that is very similar to what a lot of companies have in real-world scenarios. This solution will contain multiple websites, Azure Function, API, and a console application (to simulate some Windows service):
[wpsm_list type=”arrow”]
- ASP.NET Core MVC web applications, representing some services that the fictitious company provides to its customers. The point here is to show you how you can have a shared userbase so that if someone has signed up for one of the websites will also have access to other websites (remember SSO).
- Azure Function – this will be used as part of the authentication process. It’s useful when you want to complement the user access token with additional data, for instance, permission sets, roles, etc. for the application that the user is signing in.
- ASP.NET Core APIs – we will have some protected API endpoints to simulate some internal calls between those APIs.
- Windows service (a console application in this case) – this will demonstrate how you can call a protected API from a console application.
[/wpsm_list]
If you will be looking at the Custom Policy XML files on my Github, you’ll see that I’m using GroupId. In reality, the GroupId should be the unique identifier of the Azure AD Group (in my example I’m just using the name of the application). In my solution, each Azure AD Group represents each application. This way, you will be able to authorize users to access specific applications and assign permissions.
Creating an Azure AD B2C Tenant
As a first step, we want to create a new resource called Azure AD B2C. Once created, you need to link it with your subscription so you can then start using your active directory for registering applications, creating users, custom user flows (custom policies), and authenticating your customers.
To create a new Azure AD B2C resource, simply click on Create a resource in Azure Portal, search for ‘b2c’, select Azure Active Directory B2C, and it should bring you this screen:
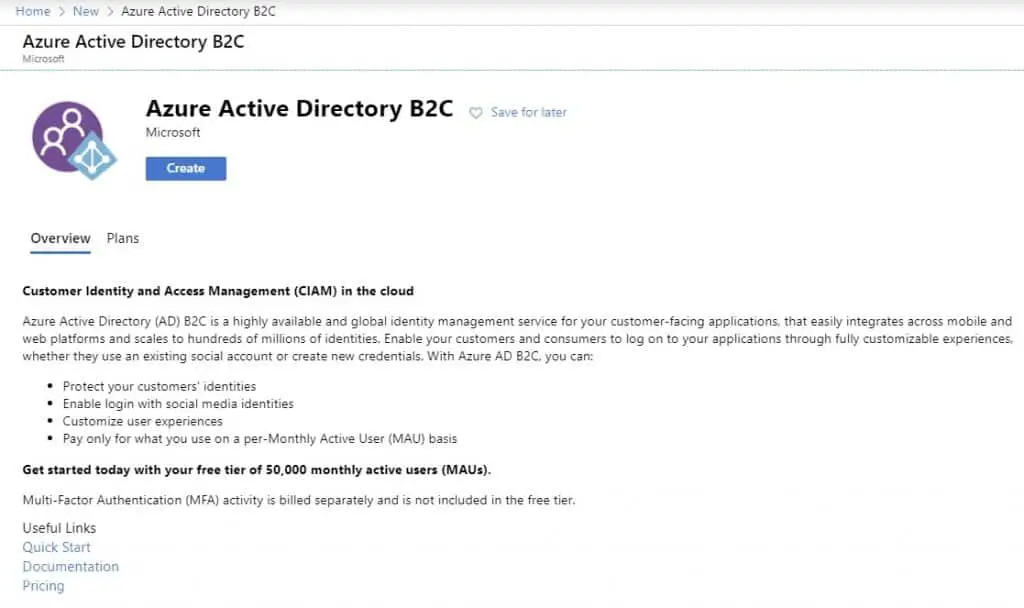
Click on Create, then Create a new Azure AD B2C Tenant. This should get you to the next screen where you will be asked to fill in some information:
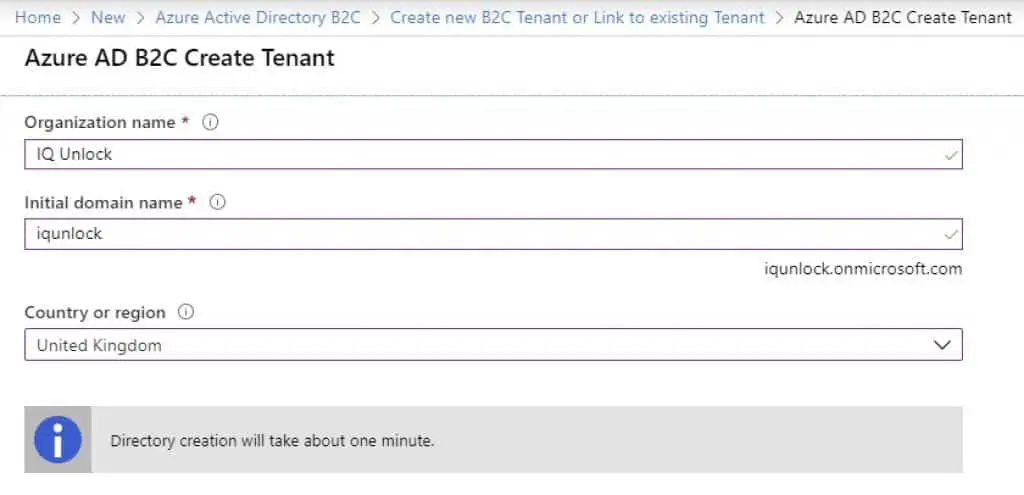
For the Initial domain name field, just enter what matches your organization. In my case, I’ve entered iqunlock. You will be able to add your real domain name later. Once you have everything filled in, just click on Create. There you have it – a brand new active directory has been created for you.
Now you need to link it to your subscription. For that, repeat the step where you clicked on Create a new resource, and instead of creating a new tenant, click on Link an existing Azure AD B2C Tenant to my Azure subscription.
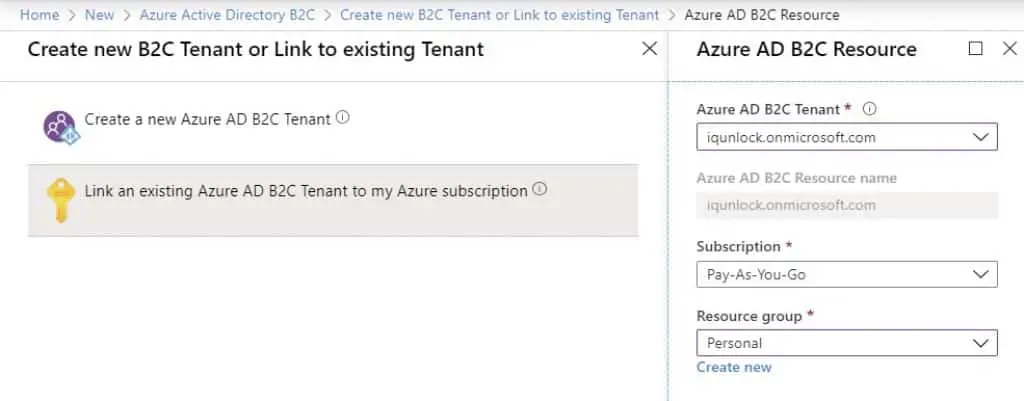
Once done, from the Azure Portal Dashboard, in the top right corner, click a funnel icon and switch to your new active directory.
Registering applications in Azure AD B2C
Next, we want to register all of our applications in Azure to tell the Azure what applications we are going to use in the authentication process.
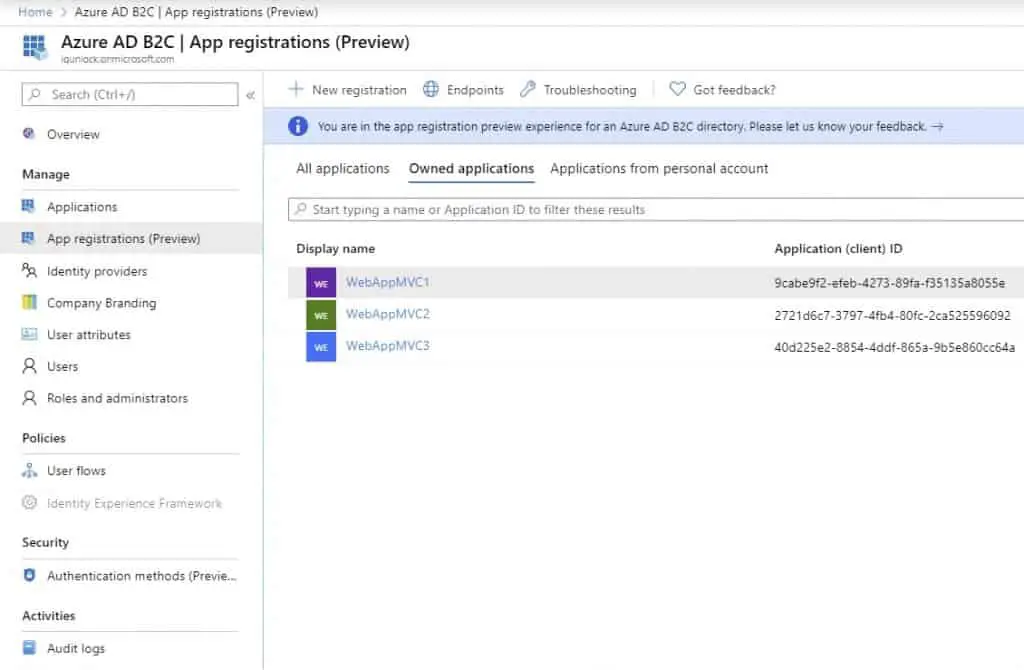
First, we will register our 3 ASP.NET Core MVC applications. I will demonstrate how you can do that with one application because for the rest of them — it will be all the same.
In the Azure Portal Dashboard, click on Search and search for Azure AD B2C. Then click on App registrations (preview), and New registration.
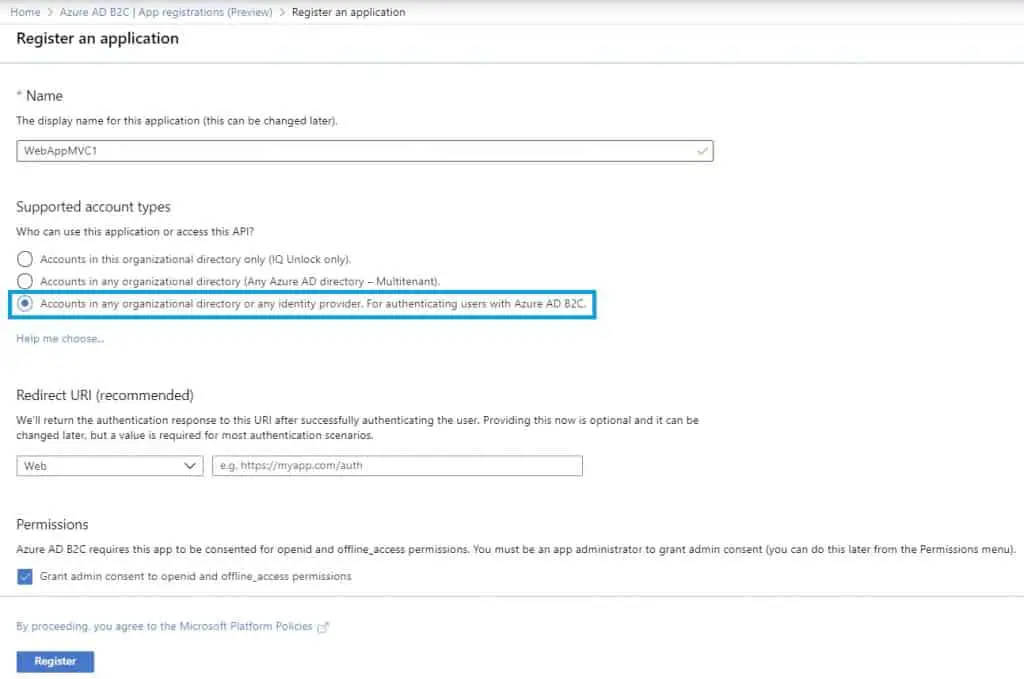
Make sure you have selected the Accounts in this organizational directory only (IQ Unlock only) option. In this article, we will be creating a single-tenanted solution. The multi-tenanted solution would be out of the scope of this article, but basically what it does it allows authenticating users from other organizations using their own active directories. It’s useful when you have some sort of business partners, etc.
I have repeated the same step for the other two MVC applications, so I ended up with this:
Registering Identity Experience Framework Applications
First, you need to add signing and ecnryption keys. Follow the steps described here in the official documentation. Just skip adding keys for Facebook for now as we won’t be using Faceblook logins in this solution, but you will be able to add that easily later on if you want.
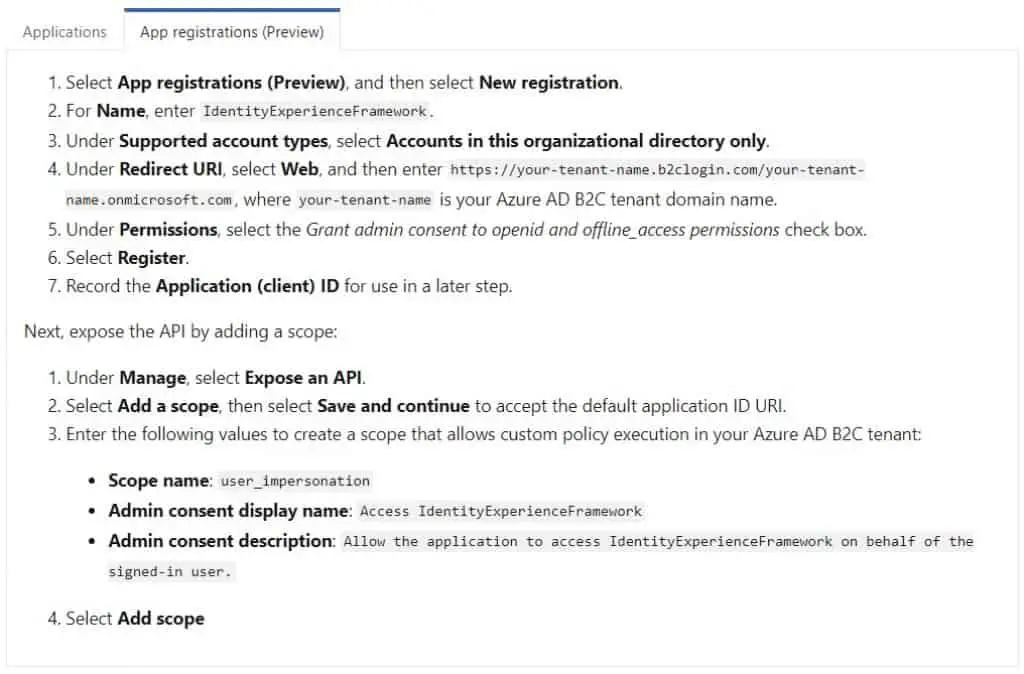
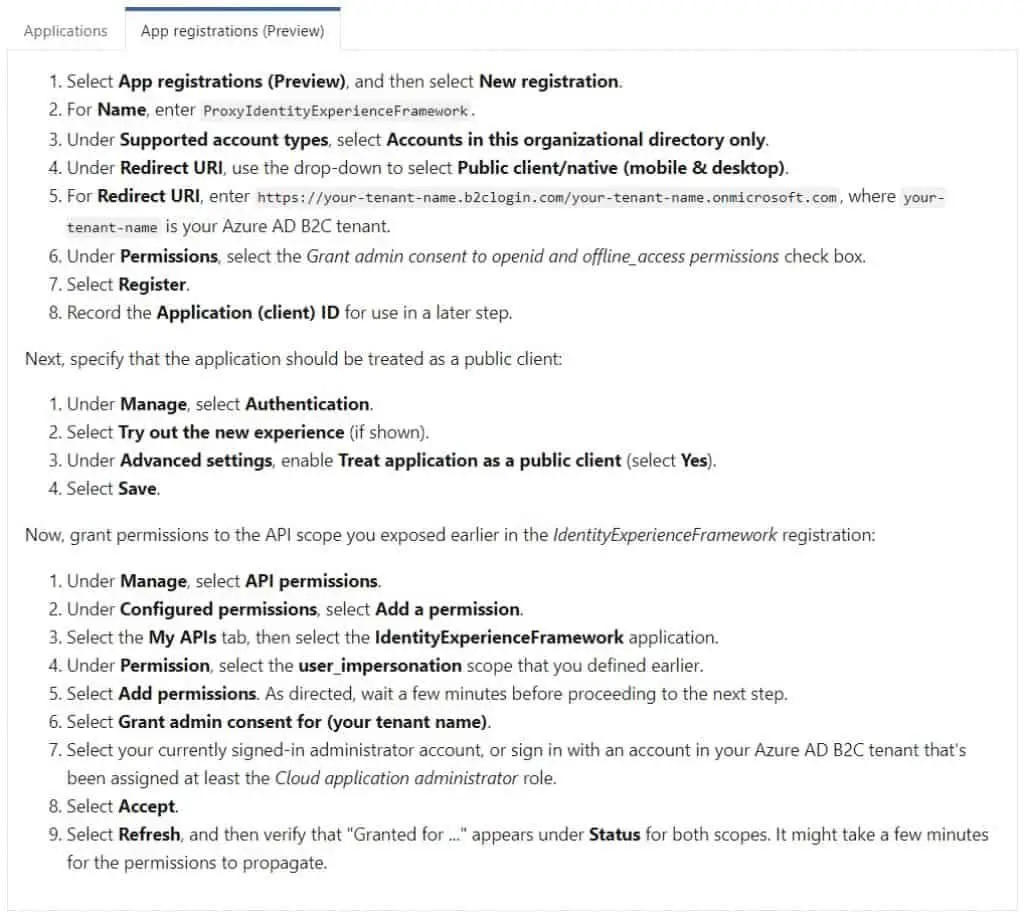
Next, there are two mandatory applications that Azure AD B2C requires. Call them as Microsoft suggests:
IdentityExperienceFramework and ProxyIdentityExperienceFramework.
Microsoft explains why do you need them really well:
Azure AD B2C requires you to register two applications that it uses to sign up and sign in users with local accounts: IdentityExperienceFramework, a web API, and ProxyIdentityExperienceFramework, a native app with delegated permission to the IdentityExperienceFramework app. Your users can sign up with an email address or username and a password to access your tenant-registered applications, which creates a “local account.” Local accounts exist only in your Azure AD B2C tenant. You need to register these two applications in your Azure AD B2C tenant only once.
Here’s how to register those two applications in Azure AD B2C.
your-tenant-name — is iqunlock in my case. Change this accordingly.
Registering IdentityExperienceFramework application:
Registering ProxyIdentityExperienceFramework application:
After completing the above steps, download the Custom Policy Starter Pack from the Microsoft official documentation page and put the zip file somewhere where convenient for you and unzip it.
Configuring Azure AD B2C Custom Policies
This is where the fun begins. At the time of writing this article, Microsoft Azure did not provide a UI to manage all that, meaning, we will need to play around with the custom policy XML files. You can think of those custom policy files as user flows or user journeys. In those XML files, there are steps defining what happens when a user is trying to sign-up or sign-in to an application.
Those custom policies are important to us as we need to add an additional step to the sign-in/sign-up user journey to tell the B2C to call our Azure Function (or any other your publicly accessible API) to include our own data in the access token issued for a logged-in user.
The user journey after modification will look like this:
[wpsm_list type=”arrow”]
- User is logging in.
- Custom Policy is triggered in Azure B2C.
- Apart from doing its stuff, Azure B2C will call the Azure Function.
- Azure Function hits our database and returns data back to B2C.
- Azure B2C generates a user access token that includes the extra data — this can be anything — roles that the user has been assigned to, permissions, etc., you name it.
- User is successfully logged in.
[/wpsm_list]
Let’s get started with configuring Azure AD B2C Custom Policy XML files. Go to the directory where you unzipped the files, go to LocalAccounts, in there, you will need to duplicate some files so you will end up with this file structure:
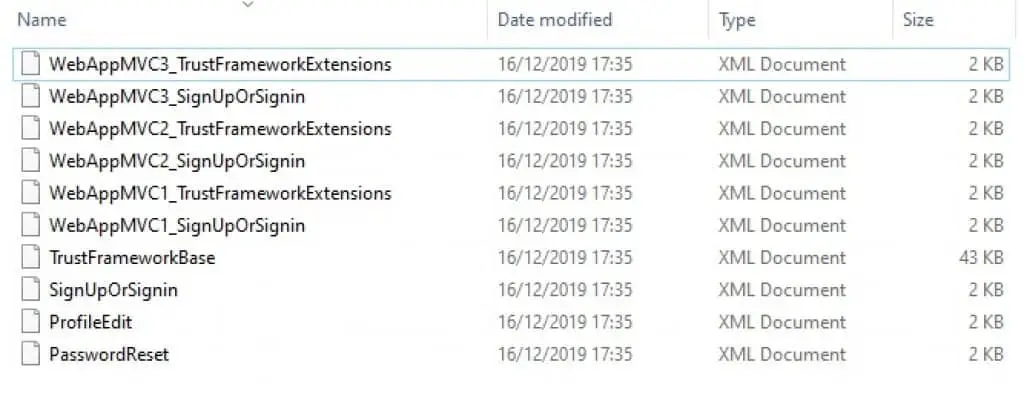
As you can see, I have duplicated the extension files and sign-up/sign-in policy files for each MVC application. The base XML file will be re-used by all other files. If you want you can keep the rest of the files, but we won’t use them in this article.
TrustFrameworkBase file
Since there is no point in copying and pasting the XML code here in this article as all the source code will be available for you on my Github, I’ll briefly describe the steps you need to take to configure those XML files. So, do the following steps in this base file:
- Modify the following attributes within the root element: TenantId, PolicyId, and PublicPolicyUri.
- Find the UserJourney element and cut it out from the base XML file. Search for this: <UserJourney Id=”SignUpOrSignIn”> and cut the whole element, including any of its child elements, and paste it in the WebAppMVC1 extension XML file within the UserJourneys element.
WebAppMVC1_TrustFrameworkExtensions files
There are some more steps involved in configuring the extension XML files:
- Modify the following attributes within the root element: TenantId, PolicyId, and PublicPolicyUri.
- Modify the BasePolicy element. The PolicyId element will be referring back to the base file PolicyId.
- Add a couple of new ClaimTypes — userPermissions and groupId.
- Modify the existing ClaimsProvider element (DisplayName – Local Account SignIn) by inserting Application IDs from previously registered two applications – IdentityExperienceFramework and ProxyIdentifyExperienceFramework.
- Below the existing ClaimsProvider element add a new ClaimsProvider element called GetUserPermissions. This is where we define the URL of the Azure Function (it can be any API URL too) we want to call to get some additional information to include in the access token. In this case, it will be the user permissions.
- Within the UserJourney (SignUpOrSignIn), add extra orchestration step with the order number of 4. With this step, we are instructing Azure B2C to call our Azure Function to get more data about the user. Don’t forget to re-order other steps that go after it. The order matters, otherwise it won’t work.
WebAppMVC1_SignUpOrSignin files
There is very little you need to do in this file:
- Modify the following attributes within the root element: TenantId, PolicyId, and PublicPolicyUri.
- Modify the BasePolicy element. The PolicyId element will be referring back to the extensions file PolicyId.
- Add a new Output Claim with ClaimTypeReferenceId of “userPermissions“.
Duplicate the extensions and SignUpOrSignIn files
We need to do this because each MVC application will be pointing to its individual SignUpOrSignIn policy. This way we can have a customized Sign-up and Sign-in page look and feel for each MVC application. For instance, each application may have its own logo or require different form fields to be filled in during the customer sign-up.
When duplicating files, make sure you just modify the root element attributes as well as the BasePolicy elements. The rest is all the same.
Please have a look in the code available on Github, take a moment to study those XML files, and you’ll understand what’s going on very quickly.
Validate your Custom Policies
There are two ways to validate these files:
[wpsm_list type=”arrow”]
- There is an XSD schema provided in the root folder of your policy files.
- Upload files to Azure AD B2C.
[/wpsm_list]
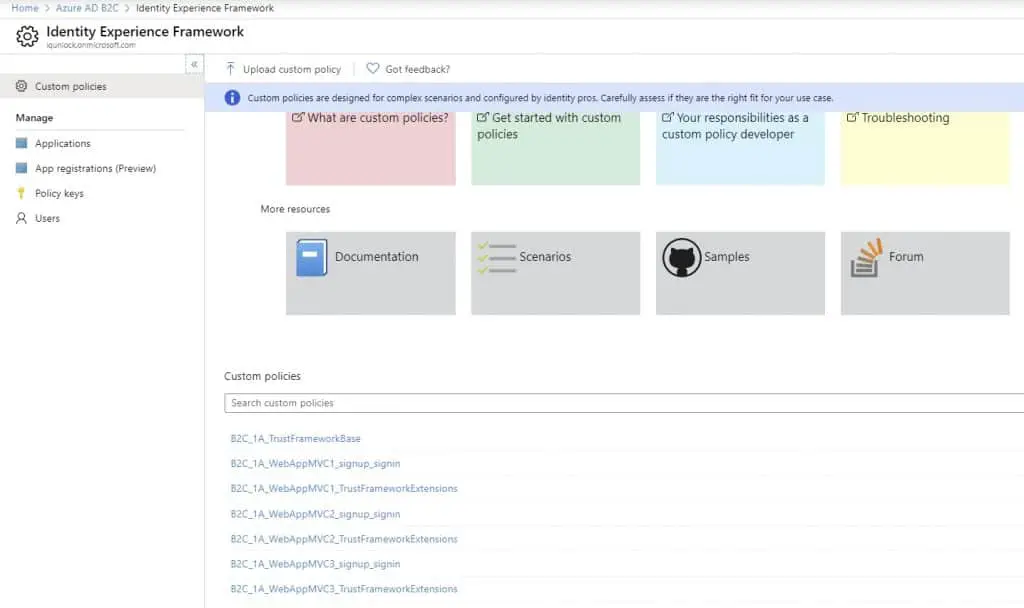
We will go with option 2 — upload files to the B2C and will see if they could be uploaded.
For that, go to Azure AD B2C, then Identity Experience Framework, then click on Upload custom policy. Select the TrustFrameworkBase as your first file to upload, tick the Overwrite the custom policy if it already exists option, and click Upload. Then upload all extensions files, and lastly, the sign-up/sign-in files.
If the upload of all the files was successful, you should see something similar to this:
Setting up MVC applications in Visual Studio
Once you have all custom policies created, configured, and uploaded to the Azure AD B2C, we can start creating Visual Studio applications. I’ll show how to create and configure one MVC application and the other two MVC applications will be all the same.
In Visual Studio, create a new project, select ASP.NET Core web application, choose MVC, and click on the link to change the Authentication settings. Here’s all you need to do here before click on the Create application button.
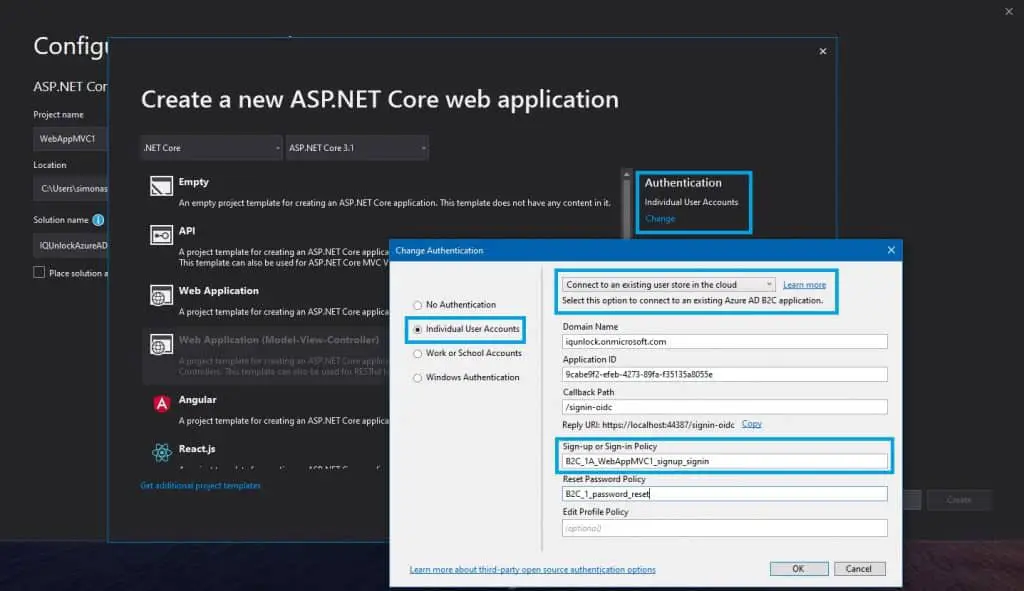
Click on your application in Azure AD B2C, you will find all these settings there. For the Password Reset policy, you’ll need to go to Azure AD B2C, then User Flows, Add new user flow, Preview, select Password reset v2, give it a name of password_reset, and you’re ready to go.
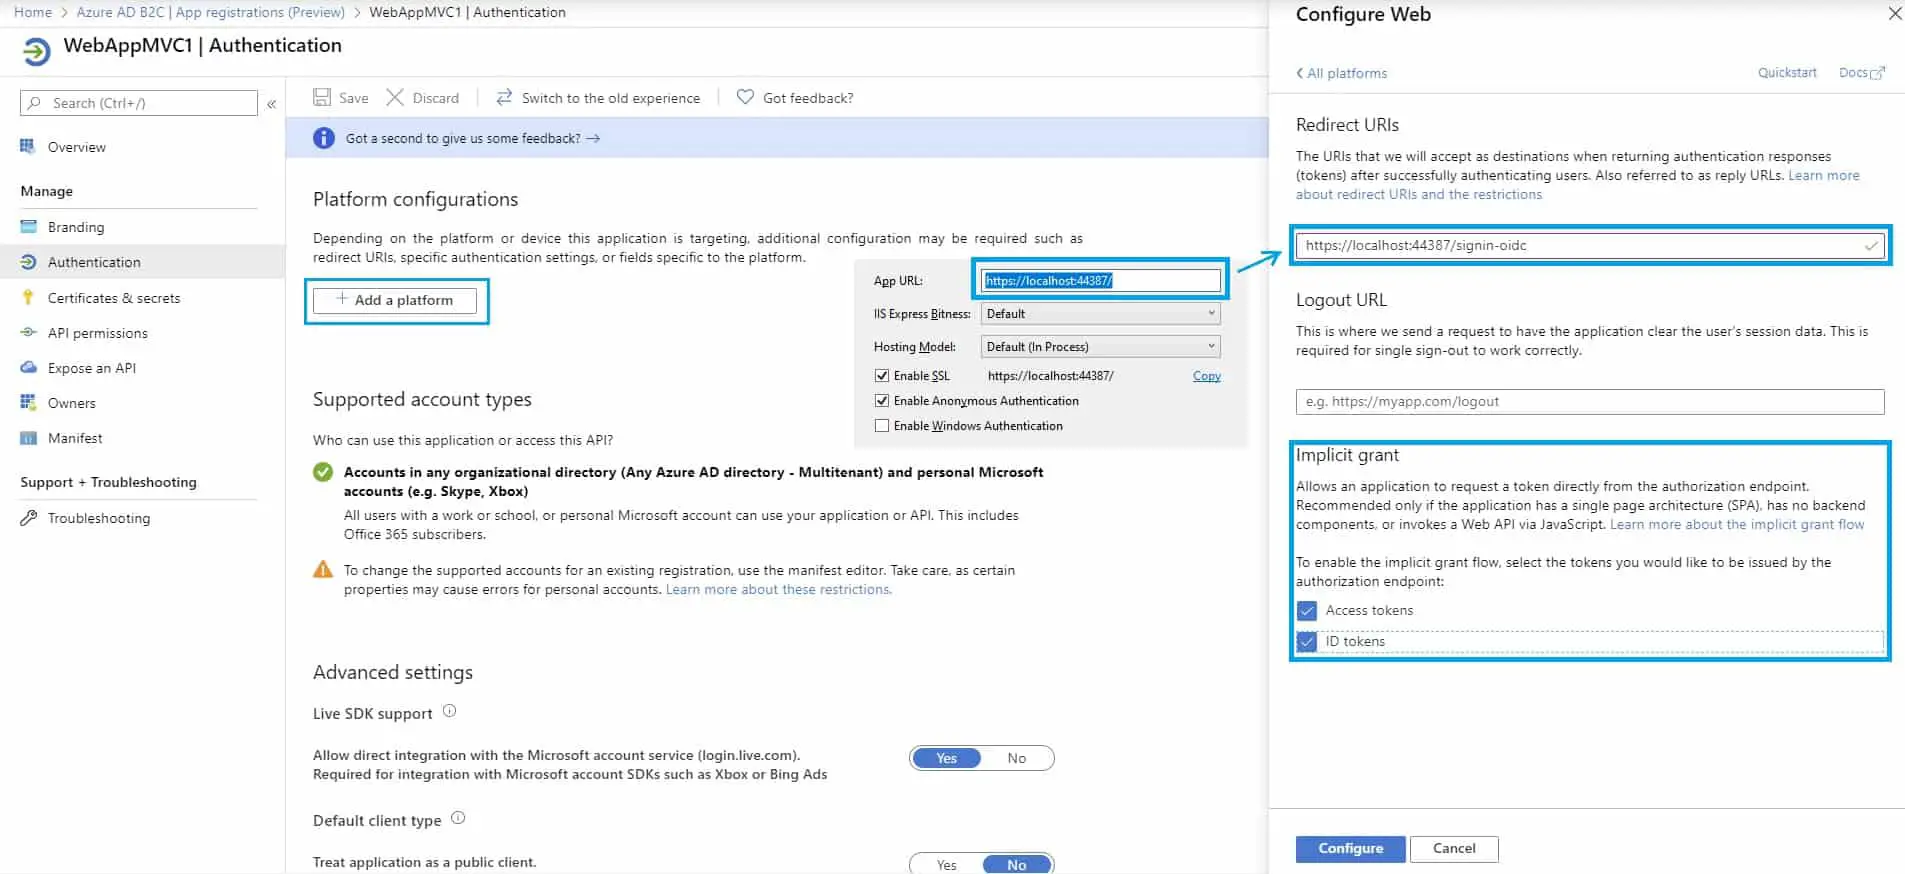
Once an MVC application has been created in Visual Studio, just right-click on the project, go to Debug settings, and set the App URL settings. You will also need to do the same in the WebAppMVC1 application in Azure AD B2C.
For that, go to Azure AD B2C, App registrations (preview), find your WebAppMVC1 application, go to the Authentication, and click on Add a platform, choose Web.
Writing and deploying the Azure Function
This is a very simple Azure Function application that returns a static set of permissions for any logged-in user. The code is commented so you can read the comments there.
You’ll have to deploy the function somewhere because Azure AD B2C will be making requests to it. I have deployed it to Azure, but as mentioned earlier, it can be an API, not necessarily the Function App.
The code is available on Github.
Once deployed, you need to modify your extension XML files and insert the URL of your Function/API instead. Then re-upload files to Azure AD B2C.
Just find the ClaimsProvider called Get user permissions, and replace the ServiceUrl bit with the address of your function.
<Item Key="ServiceUrl">https://iqunlockgetuserpermissionsfunction.azurewebsites.net/api/GetUserPermissions?code=h8tXYaWZ5NiAivCryUEig2eEK9KPZlP9Y68piVf6IC6N52ktNQMYag==</Item>That’s it. If you want to see how it works (obviously, you do) and what access token your application gets from Azure AD B2C, you can easily do that.
Add a new Azure AD B2C user: Azure AD B2C, Users menu, Add new, select Azure AD B2C, use your own email address.
Then, go to your application in Azure AD B2C, add a second redirect URL: http://jwt.ms.
Then, go to Identity Experience Framework, click on your Sign-in policy (for example, B2C_1A_WebAppMVC1_signup_signin), and click on Run now.
Login using your email and password, and you should be able to see something like this:
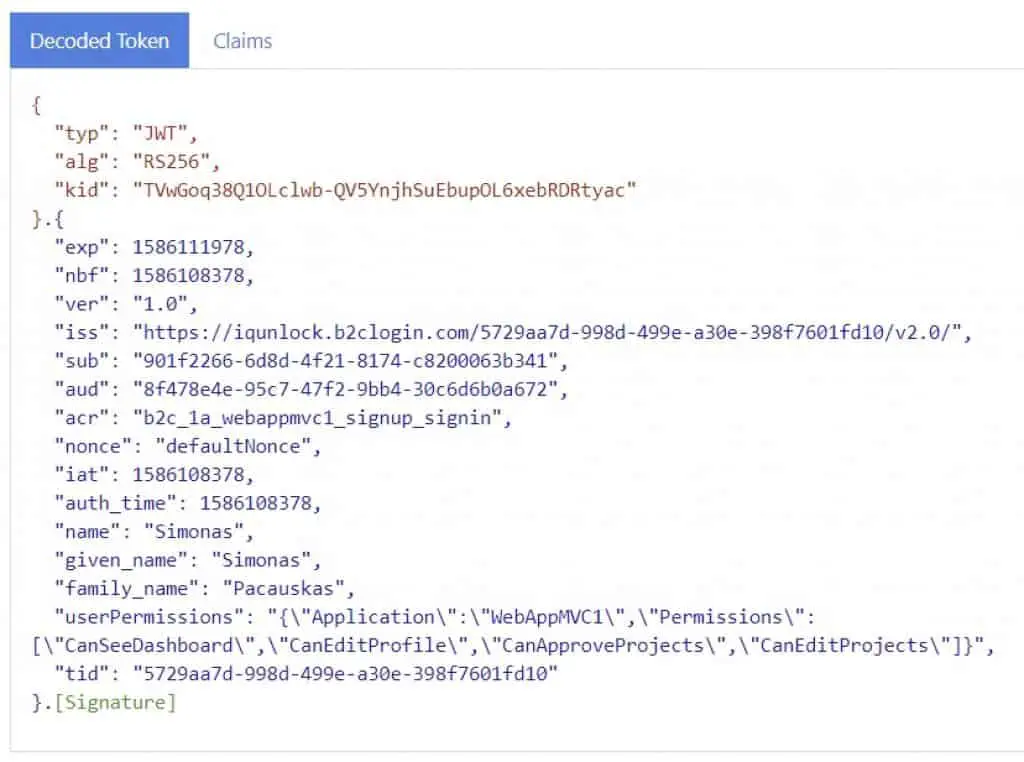
Having this information in the access token, you can write custom authorization attributes in your ASP.NET Core application and authorize (or not) your users.
Adding some protected Web API projects to the game
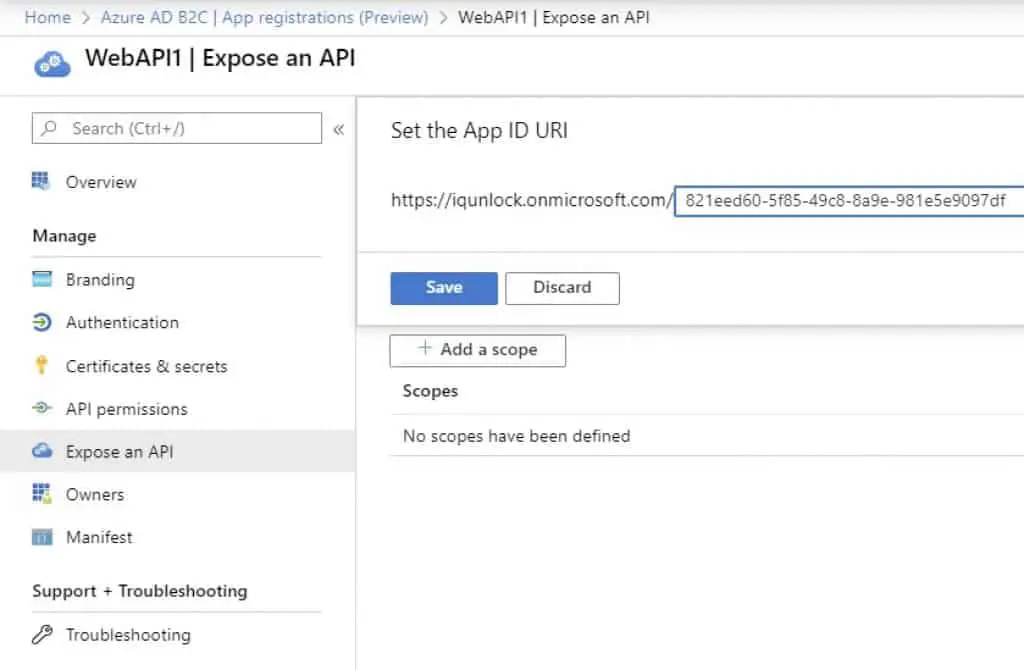
Register the API projects in Azure AD B2C, call them WebAPI1 and WebAPI2. No Redirect URLs needed.
Make sure you set the Application ID URIs for both applications:
Next, create ASP.NET Core web application (API) projects in Visual Studio (select No authentication option for these projects). Then, add Azure AD B2C settings to the appsettings.json file.
ClientId is your application ID. In the ValidIssuer setting, there’s a unique identifier, which is your Tenant Id unique identifier. It can be found by going to the application registration in Azure AD B2C.
{
  "AzureAd": {
    "Authority": "https://login.microsoftonline.com/iqunlock.onmicrosoft.com",
    "ClientId": "821eed60-5f85-49c8-8a9e-981e5e9097df",
    "AppIdUri": "https://iqunlock.onmicrosoft.com/821eed60-5f85-49c8-8a9e-981e5e9097df",
    "ValidIssuer": "https://login.microsoftonline.com/5729aa7d-998d-499e-a30e-398f7601fd10/v2.0"
  },
  "Logging": {
    "LogLevel": {
      "Default": "Information",
      "Microsoft": "Warning",
      "Microsoft.Hosting.Lifetime": "Information"
    }
  },
  "AllowedHosts": "*"
}
Add a nuget package to the API applications: Microsoft.AspNetCore.Authentication.JwtBearer, and modify the Startup classes for both projects. Then, add the [Authorize] attribute to the API controllers. Code is available on Github.
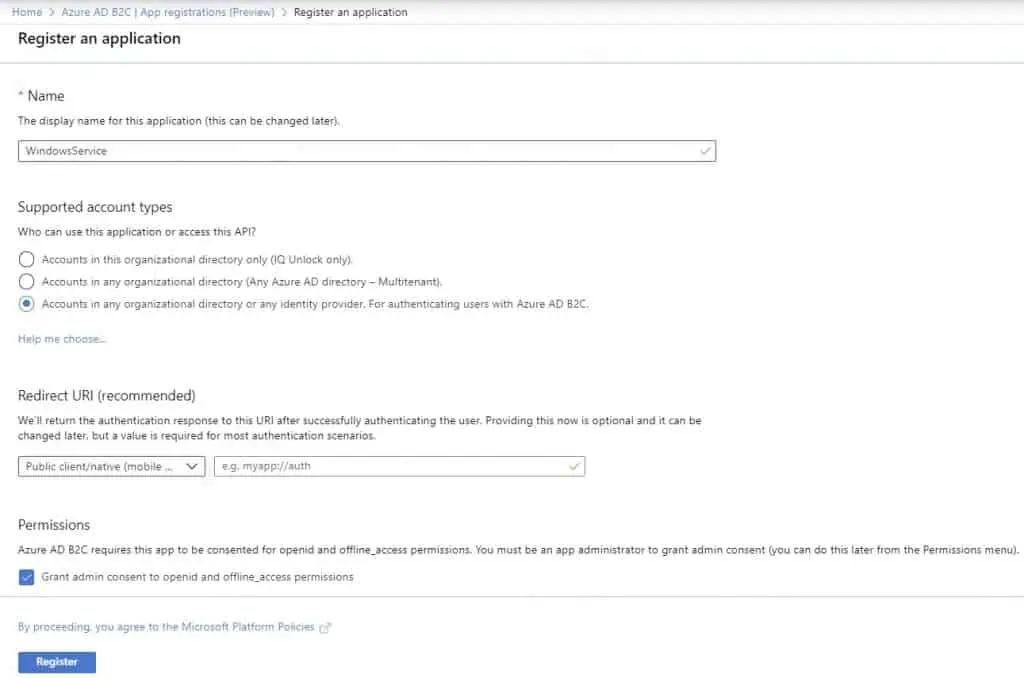
Adding a Windows Service (or a console app)
With this application, we are trying to simulate some Windows Service, which in a real-life scenario, would be calling some protected internal APIs to get the necessary information from.
Again, the first thing we want to do is to register the application in the Azure AD B2C.
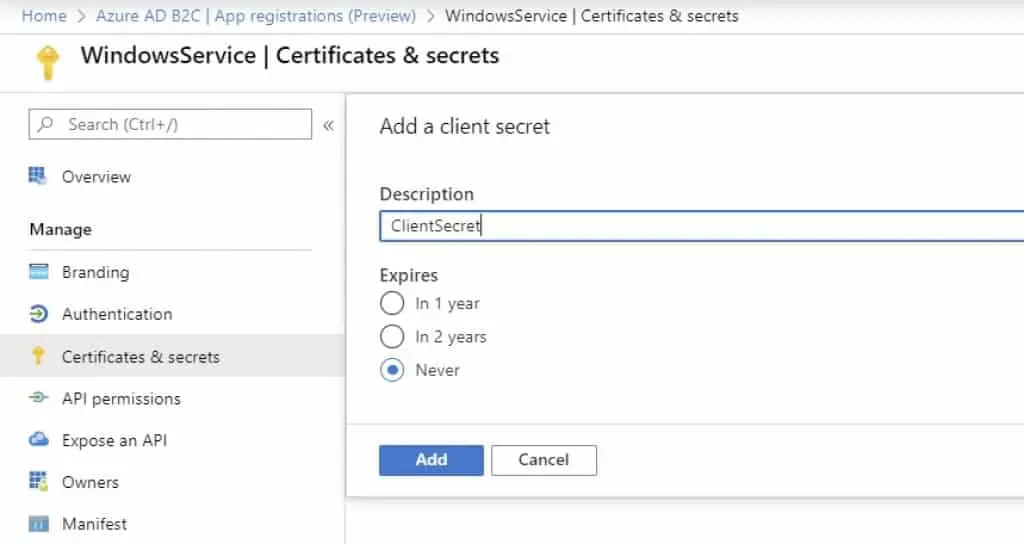
Also, create a Client secret, which will be used for acquiring the access token for the Windows Service application.
I quickly created a console application in Visual Studio that will represent the Windows Service. I have also created an ApiConsumer class with two methods. One of them will be calling the WebAPI1 application endpoint while another one will be calling the WebAPI2 application endpoint. You can see the code on Github.
Testing everything – accessing protected resources
Now that I have everything set up, configured, and coded, it’s time for testing things out. I started testing my three MVC applications to see whether the SSO works as expected. The testing scenario for this was fairly simple.
Testing MVC applications
- Started all three MVC applications within Visual Studio.
- Clicked on Sign-in link in one of them, then clicked on the Sign-up link to create a new account, using my personal email address.
- After doing that, I confirmed that the new user has been created in the Azure AD.
- I then tried to log in using the same account credentials in the other MVC applications. I was able to successfully log in. Which means SSO is working.
Testing ASP.NET Core API applications
To test whether I can access protected API endpoints (the WebAPI1 and WebAPI2 applications) from the Windows Service (console application), I had to do the following:
- Within the console application project, I’ve created an ApiConsumer class which had 2 methods — one for calling the first API and one for calling the second API.
- To acquire access tokens for my console application, I used the Microsoft.Graph client library. You can see it in the code on Github.
- Called the protected endpoints, both returned the expected responses.
What resources helped me out
Once you get familiar with it and understand all the moving parts to implement this authentication process, it doesn’t look complicated anymore. Here, I’ll write down some of the resources that helped me out with the implementation of this authentication process.
YouTube
[wpsm_list type=”arrow”]
- What is Azure Active Directory B2C? | Azure Active Directory – https://www.youtube.com/watch?v=GmBKlXED9Ug
- How to configure basic policies in Azure Active Directory B2C | Azure Active Directory – https://www.youtube.com/watch?v=nWJ3m82536A
- Azure Active Directory B2C (AAD B2C) for beginners – https://www.youtube.com/watch?v=M23P7tj_bXA
- Customer Identity Management with Azure AD – On.NET – https://www.youtube.com/watch?v=PPs1z5EYPuU
- How to use Azure AD B2C to Authenticate Users in an ASP.NET Core Web App – https://www.youtube.com/watch?v=lqfsKtoLHMQ
- How to Retrieve an OAuth 2.0 Access Token from Azure Directory B2C (Implicit Flow) – https://www.youtube.com/watch?v=cf6OHPPpthY
[/wpsm_list]
Documentation
[wpsm_list type=”arrow”]
- Custom policies in Azure Active Directory B2C – https://docs.microsoft.com/en-us/azure/active-directory-b2c/custom-policy-overview
- Get started with custom policies in Azure Active Directory B2C – https://docs.microsoft.com/en-us/azure/active-directory-b2c/custom-policy-get-started?tabs=applications
- Developer notes for custom policies in Azure Active Directory B2C – https://docs.microsoft.com/en-us/azure/active-directory-b2c/custom-policy-developer-notes
- Collect Azure Active Directory B2C logs with Application Insights – https://docs.microsoft.com/en-us/azure/active-directory-b2c/troubleshoot-with-application-insights
- Azure Active Directory B2C documentation – https://docs.microsoft.com/en-us/azure/active-directory-b2c/
- Microsoft Graph REST API v1.0 reference – https://docs.microsoft.com/en-us/graph/api/overview?view=graph-rest-1.0
- Microsoft Graph API Explorer – https://developer.microsoft.com/en-us/graph/graph-explorer
[/wpsm_list]
Because I’m a big fan of watching courses on Pluralsight (link to the Pluralsight review article) and I do have a subscription, I have watched these Pluralsight courses to help me get going:
[wpsm_list type=”arrow”]
- Introduction to OAuth2, OpenID Connect and JSON Web Tokens (JWT) – https://app.pluralsight.com/library/courses/oauth2-json-web-tokens-openid-connect-introduction
- Securing ASP.NET Core 3 with OAuth2 and OpenID Connect – https://app.pluralsight.com/library/courses/securing-aspnet-core-3-oauth2-openid-connect
- Azure AD for Developers – https://app.pluralsight.com/library/courses/azure-active-directory-developers
- Managing Identities in Microsoft Azure Active Directory – https://app.pluralsight.com/library/courses/microsoft-azure-active-directory-managing-identities
- Design Identity Management in Microsoft Azure – https://app.pluralsight.com/library/courses/microsoft-azure-identity-management-design
- Design Authentication for Microsoft Azure – https://app.pluralsight.com/library/courses/microsoft-azure-authentication-design
[/wpsm_list]
Conclusion
This was just a small part of the project that I’m currently working on in my current company. To me, it was a bit confusing in the beginning, so I wanted to put together this article to build everything from scratch once again, share everything with the readers to save some hours/days for someone, and at the same time to strengthen my knowledge on this.
I’m sure there are lots uncovered in this article, like customizing sign-up page layouts, how to do the authorization/permission bits, how to implement the wrapper of the Graph API client using .NET Core, and a lot more. I’ll leave it for the next article at some point in the future.